
Beginner's Guide to Gaussian Splatting
1. Introduction
Gaussian Splatting revolutionizes novel-view synthesis by using 3D anisotropic Gaussians.
Each splat has position (μ), covariance (Σ), view-dependent color, and alpha. Real-time rendering is possible without mesh conversion or neural networks. Achieves 1080p at 30–100 fps on modern GPUs.
Useful for AR/VR, digital twins, and visualization.
2. What is Gaussian Splatting?
Gaussian Splatting is a technique for representing 3D scenes and rendering new views of those scenes. In simple terms, it works by modeling the scene as a collection of many small 3D Gaussian blobs (ellipsoids) instead of using traditional surface meshes or volumetric grids. Each Gaussian has a position in 3D space, a size and shape (defined by a covariance matrix, which can make it an oriented ellipsoid), and color and opacity values. When rendering an image from a new viewpoint, all these Gaussian splats are projected onto the image plane and blended (or “splatted”) to produce a photorealistic result.
For beginners, you can think of Gaussian Splatting as painting the scene with thousands or millions of fuzzy little 3D points. When you move the camera, instead of re-computing a heavy 3D model, the system just redraws these points from the new angle very quickly. This approach is an alternative to Neural Radiance Fields (NeRF) and similar methods. Unlike NeRF, Gaussian Splatting does not use any neural network to represent the scene – there is no multi-layer perceptron at all. The entire scene is captured by the Gaussian points themselves, which makes it a refreshingly simple (yet powerful) method in an era where many 3D methods rely on deep learning.
In summary, Gaussian Splatting represents a 3D scene as a set of colored, semi-transparent Gaussian ellipsoids in space. This representation preserves important visual details of the scene and allows extremely fast rendering of new views because drawing (rasterizing) these Gaussians is much faster than querying a complex neural network for every pixel. The result is a technique that achieves high image quality and can even render real-time (30 frames per second or more) at 1080p resolution, given appropriate hardware.
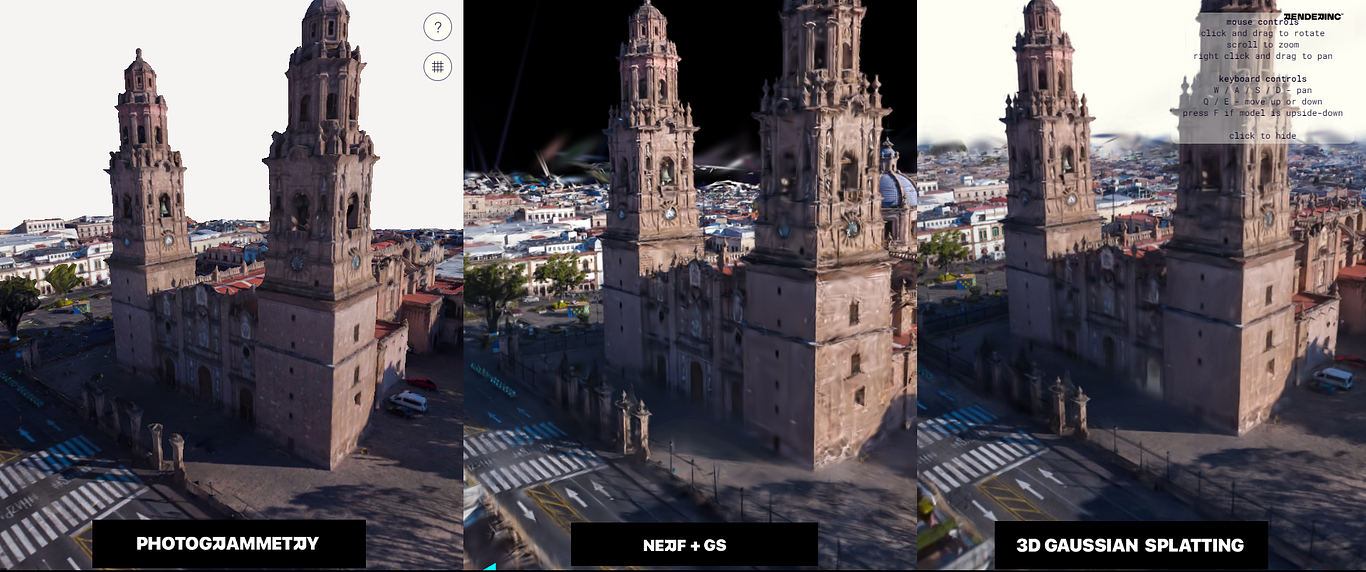
Overview of the Technique and How It Differs from Traditional Methods
3D Gaussian Splatting vs. Traditional Rendering: Traditional rendering typically uses polygonal meshes (drawing triangles) or volumetric ray-marching through a neural field (like NeRF). Gaussian Splatting takes a different approach—it’s a point-based rendering method using rasterization. While traditional methods draw triangles to the screen, Gaussian Splatting projects 3D Gaussians. When projected, each Gaussian creates a splat (a 2D image footprint) that adds color to nearby pixels, much like a blurred point.
The key difference from NeRF-like methods lies in scene composition. NeRF uses a neural network to calculate color and density along camera rays, querying a continuous function with many samples per pixel. In contrast, Gaussian Splatting works with a discrete set of points—it identifies which Gaussians affect each pixel and blends them together. Where NeRF integrates multiple points along a ray through an MLP, Gaussian Splatting simply blends pre-defined Gaussian primitives. This approach offers a significant speed boost since it can ignore empty space and focus only on rendering actual points.
Unlike neural methods, Gaussian Splatting has no training of a neural network. Instead, it optimizes the Gaussians themselves—their positions, sizes, colors, and transparencies. This direct optimization often leads to faster convergence. The method starts with initial Gaussian positions from sparse 3D reconstruction (via camera calibration or Structure-from-Motion). Since the representation is inherently spatial, computations focus only on areas containing points, efficiently skipping empty regions.
Why is it faster? Gaussian Splatting shines in rendering speed. Its efficient custom CUDA kernels enable frame rates exceeding 100 fps in some cases, while optimized neural field methods like Instant NeRF typically reach only 15–30 fps at similar quality. The method also trains faster: while other approaches often compromise between speed and quality, Gaussian Splatting achieves high quality quickly and continues improving with more training time. The bottom line is simple: through clever point-based representation and optimization, Gaussian Splatting matches the visual quality of neural methods while delivering real-time performance.
3. How It Works
A. Structure-from-Motion (SfM):
Use COLMAP to generate camera poses:
colmap feature_extractor …
colmap mapper …
B. Gaussian Initialization:
Initialize Gaussians from sparse COLMAP points.
C. Optimization Loop:
Use L1 + SSIM loss to match predicted image to ground truth.
Split/merge Gaussians dynamically.
D. Rendering:
Tile-based, depth-aware GPU blending for real-time output.
4. How It Works: In-Depth Breakdown
Tools & Workflows
- Official: https://github.com/graphdeco-inria/gaussian-splatting
- NeRF-Studio integration: https://github.com/nerfstudio-project/nerfstudio
- Simple CUDA version: https://github.com/WangFeng18/3d-gaussian-splatting
- Vulkan Demo: https://github.com/nvpro-samples/vk_gaussian_splatting
- Web Demo: https://github.com/Fyrox/gaussian_splatting_webgl
A. Structure‑from‑Motion (SfM)
- Use COLMAP for dense alignment:
bash
CopyEdit
colmap feature_extractor --image_path images/ --database_path data.db
colmap mapper --database_path data.db --image_path images/ --output_path colmap_out/
- Outputs camera poses + sparse point cloud.
B. Gaussian Initialization
- Convert point cloud into Gaussians: initial Σ based on local point spacing (e.g. σ = average nearest-neighbor distance).
C. Optimization: Core Loop
Rendering: Rasterize each Gaussian within a screen-space tile, blend per-pixel based on depth and opacity.
Loss: L1(image) + D-SSIM for structure preservation:
L=λ1∥Ipred−Igt∥1+λssim(1−SSIM)L = \lambda_1 \|I_{\text{pred}} – I_{\text{gt}}\|1 + \lambda{ssim}(1 – \mathrm{SSIM})L=λ1∥Ipred−Igt∥1+λssim(1−SSIM)
Adaptation: Split high-gradient or large splats; prune low-alpha splats.
Optimization Algorithm:
python
CopyEdit
optimizer = torch.optim.Adam(model.parameters(), lr=lr)
for step in range(total_steps):
    I_pred = model.render(train_cameras)
    loss = l1_weight * L1(I_pred, I_gt) + ssim_weight * (1 - SSIM(I_pred, I_gt))
    loss.backward()
    optimizer.step()
    model.adaptive_density_control()
D. Real-Time Rasterization
- Via GPU: tile-wise culling → depth sort → alpha compositing—enables high fps visualization
5. Use Cases & Applications
- Photoreal AR/VR (e.g. mobile capture to headset)
- Cultural heritage and museum scans
- Digital twins for architecture
- Robotics and simulation mapping
- Niantic Scaniverse: https://scaniverse.com/
6. Pros & Cons
✔ Real-time rendering
✔ Smooth geometry approximation
✔ Compatible with COLMAP + photogrammetry
✘ High VRAM (20–40 GB for complex scenes)
✘ Static only (no motion unless extended to 4D)
7. Hands-On: Setup, Training & Rendering
🔧 Setup
bash
CopyEdit
git clone --recursive <https://github.com/graphdeco-inria/gaussian-splatting.git>
cd gaussian-splatting
conda env create -f environment.yml
conda activate gsplat
- Install COLMAP, ffmpeg, ImageMagick.
🎥 Extract Frames
bash
CopyEdit
ffmpeg -i input.mp4 -vf fps=2 data/%04d.jpg
☁️ Generate SfM Data
bash
CopyEdit
colmap feature_extractor --image_path data --database_path db.db
colmap mapper --database_path db.db --image_path data --output_path sparse/
⚙️ Train via gSplat
bash
CopyEdit
gsplat train --data sparse/ --output_dir output/ \\
  --lr 0.001 --ssim_weight 0.05 --split_thresh 0.1
🖼 Render & Visualize
bash
CopyEdit
python render.py --model output/latest.pth \\
  --out_dir out_images --camera_path test_cameras.json
- Viewer mode:
python render.py --model ... --vieweropens OpenGL interactive window.
Jawset Postshot
Jawset Postshot is an end-to-end software solution from Jawset Visual Computing that creates photorealistic 3D scenes from standard photos or videos. Using advanced radiance field techniques particularly Gaussian Splatting Postshot lets users reconstruct scenes and render images from new angles through a seamless workflow of tracking, training, editing, and rendering. jawset.com
Key Features:
- Photorealistic Scene Reconstruction: Transform standard images or videos into detailed 3D scenes using state-of-the-art radiance field techniques.
- Live Preview During Training: Watch and interact with your 3D scene as it develops, enabling quick adjustments during the training process.
- Integration with Adobe After Effects: Import radiance fields directly into Adobe After Effects for seamless rendering and compositing.
- Local Processing for Data Security: All processing happens on your computer, keeping your images secure without cloud uploads.
Getting Started with Postshot:
- Capture Media: Record a video or take multiple photos of your subject from different angles.
- Import into Postshot: Drag and drop your media into Postshot. The software will help you set up training parameters.
- Training and Reconstruction: Let Postshot process your media to create the 3D scene. Monitor and interact with the scene as it develops.
- Rendering and Export: After training, create rendered movies, animate camera movements, or export your 3D scene to other applications.
System Requirements:
- Operating System: Windows 10 or later.
- Graphics Processing Unit (GPU): Nvidia GPU GeForce RTX 2060, Quadro T400/RTX 4000, or higher.
Polycam
Polycam is a versatile 3D scanning application that enables users to create high-quality 3D models using various capture methods, including photogrammetry and LiDAR. Recently, Polycam introduced a feature called Gaussian Splatting, a cutting-edge rendering technique that excels at producing lifelike, natural-looking 3D scenes and subjects. poly.cam
Step-by-Step Guide to Using Gaussian Splatting on Polycam
Note: The following steps outline how to create Gaussian Splats using Polycam’s web platform.
- Access Polycam’s Gaussian Splatting Tool:
- Visit Polycam’s Gaussian Splatting page:
- Click on “Create Gaussian Splat” to start the process
- Upload Your Media:
- For Images:
- Ensure you have a set of 20 to 1000 images in PNG or JPG format.
- Click “Upload Images” and select your files.
- For Videos:
- Prepare a video between 15 seconds and 15 minutes in length, in formats like MP4, MOV, AVI, or M4V.
- Click “Upload Video” and choose your file.
- For Images:
- Configure Processing Settings:
- For Images:
- If your images are organized sequentially, ensure they are uploaded in the correct order to maintain proper sequence during analysis.
- For Videos:
- If the video includes fast movement, enable “Smart Key-Framing” to improve the final 3D representation.
- For Images:
- Initiate Processing:
- After uploading, click “Start Processing.”
- Processing time varies based on file size and quantity, typically ranging from 10 to 45 minutes
- Review and Edit Your Splat:
- Once processing is complete, you can view your Gaussian Splat in Polycam’s viewer.
- Utilize available tools to rotate, pan, zoom, and make any necessary edits.
- Export Your Splat:
- If satisfied with the result, you can export the Gaussian Splat for use in other applications.
- Polycam allows exporting in formats compatible with software like Unity and Unreal Engine.
Tips for Optimal Results:
- Image Quality: Ensure images or videos are free from motion blur and have a consistent depth of field to avoid artifacts known as “floaters.”
- Coverage: Capture your subject from various angles and viewpoints to provide comprehensive data for reconstruction.
- Lighting: Well-lit scenes with minimal shadows yield better 3D models.
For a visual walkthrough, you can refer to Polycam’s tutorial on creating Gaussian Splats
KIRI Engine
KIRI Engine is a versatile 3D scanning app that uses photogrammetry and advanced techniques like 3D Gaussian Splatting (3DGS) to create photorealistic 3D models with just your smartphone. This technology turns short videos or photo sequences into high-fidelity 3D visualizations.
https://www.kiriengine.app/blog/announcement/3d-gaussian-splatting-editing-on-smartphones
Step-by-Step Guide to Using KIRI Engine’s 3D Gaussian Splatting Feature:
- Download and Install KIRI Engine:
- For iOS:
- For Android:
- Capture Your Subject:
- Using Video Mode:
- Open the KIRI Engine app and select video capture mode.
- Move slowly around your subject, capturing it from various angles.
- Keep your movements smooth and steady for better 3D reconstruction.
- Using Photo Mode:
- Take a series of high-quality photos from different angles around your subject.
- Maintain consistent lighting and focus throughout.
- Using Video Mode:
- Upload Media for Processing:
- Tap the upload button in the app.
- Select your captured video or photo sequence.
- Choose the 3D Gaussian Splatting (3DGS) processing option.
- Processing the 3D Model:
- The app will reconstruct your 3D model using 3DGS.
- Processing time depends on media length and complexity.
- You’ll get a notification when processing is complete.
- Editing Your 3D Model:
- KIRI Engine provides in-app editing tools:KIRI Engine: 3D Scanner App
- Sphere Cropping: Shape your 3D scene with a spherical tool to include or exclude content.
- Plane Tool: Make clean, planar cuts to remove unwanted areas.
- Brush Tool: Select specific areas with adjustable brush sizes for precise editing.
- Edit your models directly on your smartphone with these intuitive tools.
- KIRI Engine provides in-app editing tools:KIRI Engine: 3D Scanner App
- Exporting and Utilizing Your 3D Model:
- Export your model in OBJ, PLY, and other formats.KIRI Engine: 3D Scanner App
- Use your models in Blender, Unity, and Unreal Engine.KIRI Engine: 3D Scanner App
- Take advantage of KIRI Engine’s free, open-source 3DGS add-on for Blender integration.KIRI Engine: 3D Scanner App+2KIRI Engine: 3D Scanner App+2KIRI Engine: 3D Scanner App+2
Tips for Optimal Results:
- Consistent Lighting: Use uniform lighting to avoid shadows and highlights that could affect reconstruction quality.
- Steady Capture: Keep your device stable or use stabilization tools to prevent motion blur.
- Comprehensive Coverage: Capture your subject from multiple angles for the best 3D reconstruction.KIRI Engine: 3D Scanner App+3KIRI Engine: 3D Scanner App+3KIRI Engine: 3D Scanner App+3
Scaniverse
This will be a redirection to another use case post on this website
System Requirements
Hardware
- A decent NVIDIA GPU (RTX 30xx+ recommended)
- At least 16GB RAM
- 10–20GB of free disk space
Software
- Ubuntu 20.04 or later
- CUDA 11.8 or later
- Python 3.8–3.11
- Git
- NVIDIA drivers installed and working
option A
FULL SCRIPT
# Create a Windows PowerShell script for installing Gaussian Splatting with COLMAP
windows_script = “””
# Gaussian Splatting + COLMAP Setup Script for Windows (PowerShell)
# === 1. Install Chocolatey if not installed ===
Write-Host “Checking for Chocolatey…”
if (!(Get-Command choco -ErrorAction SilentlyContinue)) {
Write-Host “Installing Chocolatey…”
Set-ExecutionPolicy Bypass -Scope Process -Force
[System.Net.ServicePointManager]::SecurityProtocol = [System.Net.SecurityProtocolType]::Tls12
iex ((New-Object System.Net.WebClient).DownloadString(‘https://chocolatey.org/install.ps1’))
} else {
Write-Host “Chocolatey is already installed.”
}
# === 2. Install Miniconda ===
Write-Host “Installing Miniconda…”
choco install miniconda3 –yes –params=\”/AddToPath:1 /RegisterPython:1\”
# === 3. Refresh environment variables ===
$env:Path = [System.Environment]::GetEnvironmentVariable(“Path”,”Machine”)
# === 4. Create Conda Environment ===
Write-Host “Creating Conda environment…”
conda create -y -n gs-env python=3.10
conda activate gs-env
# === 5. Install PyTorch with CUDA ===
Write-Host “Installing PyTorch…”
pip install torch torchvision torchaudio –index-url https://download.pytorch.org/whl/cu118
# === 6. Install Required Python Packages ===
Write-Host “Installing Python dependencies…”
pip install numpy imageio matplotlib open3d plyfile tqdm scikit-image opencv-python
pip install pycolmap==0.4.0
# === 7. Clone Gaussian Splatting Repository ===
Write-Host “Cloning Gaussian Splatting…”
git clone https://github.com/graphdeco-inria/gaussian-splatting.git
cd gaussian-splatting
pip install -r requirements.txt
python setup.py build_ext –inplace
# === 8. Install COLMAP ===
Write-Host “Downloading COLMAP…”
Invoke-WebRequest -Uri “https://colmap.github.io/releases/colmap-3.9-windows.zip” -OutFile “COLMAP.zip”
Expand-Archive -Path “COLMAP.zip” -DestinationPath “$env:ProgramFiles\\COLMAP”
$colmapPath = “$env:ProgramFiles\\COLMAP\\COLMAP.bat”
if (Test-Path $colmapPath) {
Write-Host “COLMAP installed successfully at $colmapPath”
[Environment]::SetEnvironmentVariable(“Path”, $env:Path + “;$env:ProgramFiles\\COLMAP”, “Machine”)
} else {
Write-Host “COLMAP installation failed.”
}
# === 9. Download Sample Scene (Optional) ===
Write-Host “Downloading sample scene (bonsai)…”
cd scripts
bash download_sample_scene.sh bonsai
cd ..
# === 10. Convert Scene ===
Write-Host “Converting bonsai scene…”
python convert.py -s data/bonsai
# === 11. Train the Gaussian Model ===
Write-Host “Starting training…”
python train.py -s output/bonsai
Write-Host “✅ Gaussian Splatting and COLMAP installation complete!”
“””
# Save the script as a .ps1 file
script_path = “/mnt/data/install_gaussian_splatting_with_colmap_windows.ps1”
with open(script_path, “w”) as file:
file.write(windows_script)
script_path
🧰 What This Script Does:
- Installs Chocolatey (if not installed)
- Installs Miniconda
- Creates a Conda environment with Python 3.10
- Installs PyTorch (CUDA 11.8) and all required dependencies
- Clones the Gaussian Splatting GitHub repo
- Builds the CUDA extensions
- Installs COLMAP
- Optionally downloads and trains on the bonsai sample scene
▶️ How to Use It:
- Open PowerShell as Administrator
- Run:
powershell
KopiërenBewerken
Set-ExecutionPolicy Bypass -Scope Process -Force
./install_gaussian_splatting_with_colmap_windows.ps1
option b
✅ 1. Install Dependencies
Install system packages:
sudo apt update
sudo apt install git build-essential cmake libglfw3-dev libglew-dev python3-dev python3-pip
(Optional) Use pyenv to manage Python versions:
curl <https://pyenv.run> | bash

# Add pyenv to shell startup
echo -e '\\n# Pyenv setup' >> ~/.bashrc
echo 'export PATH="$HOME/.pyenv/bin:$PATH"' >> ~/.bashrc
echo 'eval "$(pyenv init --path)"' >> ~/.bashrc
echo 'eval "$(pyenv virtualenv-init -)"' >> ~/.bashrc
source ~/.bashrc

# Install Python 3.10
pyenv install 3.10.13
pyenv virtualenv 3.10.13 gs-env
pyenv activate gs-env
✅ 2. Clone the Repository
git clone <https://github.com/graphdeco-inria/gaussian-splatting.git>
cd gaussian-splatting
✅ 3. Set Up Python Environment
Option A: Use pip & venv
python3 -m venv venv
source venv/bin/activate
Option B: Use pyenv (already activated in step 1)
✅ 4. Install Python Dependencies
pip install -r requirements.txt
If you encounter issues with pycolmap, try:
pip install pycolmap==0.4.0
✅ 5. Compile the CUDA Code
The repository has a few C++/CUDA extensions that must be built:
cd gaussian-splatting
python setup.py build_ext --inplace
If you get errors about nvcc or CUDA, make sure:
- CUDA is installed (
nvcc --version) - Your environment variables are set correctly:
export PATH=/usr/local/cuda/bin:$PATH
export LD_LIBRARY_PATH=/usr/local/cuda/lib64:$LD_LIBRARY_PATH
✅ 6. Download or Prepare a Dataset
They recommend starting with a sample dataset like the bonsai one.
cd scripts
bash download_sample_scene.sh bonsai
It will create a folder like: data/bonsai
✅ 7. Preprocess the Data
This will convert the dataset to a format usable by the renderer.
cd ..
python convert.py -s data/bonsai
This will generate a folder like output/bonsai.
✅ 8. Train the Gaussian Model
This step builds the actual splats!
python train.py -s output/bonsai
You should see a training window with a real-time viewer and logs.
Training can take a while depending on your GPU and scene size.
✅ 9. Render or Export
Run the viewer:
python render.py -s output/bonsai
You can also export the scene using the export.py script, or render videos/images.
🛠️ Common Issues
⚠️ “No module named ‘pycolmap'”
Install it explicitly:
pip install pycolmap
⚠️ CUDA errors
Check if your CUDA version is compatible with your PyTorch version.
You can install a matching PyTorch build like so:
pip install torch torchvision torchaudio --index-url <https://download.pytorch.org/whl/cu118>
(Replace cu118 with your CUDA version.)
🧪 Optional: Use COLMAP to Create Your Own Scene
If you want to generate Gaussian Splatting from your own photos:
- Install COLMAP
- Run COLMAP to get a sparse + dense reconstruction
- Use the COLMAP output in the
convert.pystep
8. Challenges & Best Practices
- Prune low-opacity Gaussians to reduce memory
- Use –data_factor to downscale inputs
- Split Gaussians with large covariance for detail
- Regularize covariance growth
9. FAQ & Myths
Q: Does it require a GPU?
A: Yes, CUDA GPU with 20+ GB VRAM recommended.
Q: Is it better than NeRF?
A: Comparable quality but renders in real-time.
Q: Can it do dynamic scenes?
A: Only with experimental 4D extensions.
10. Further Reading & Resources
- Papers:
- 3D Gaussian Splatting (Kerbl et al., SIGGRAPH ’23)
- DashGaussian & Opti3DGS (Mar 2025)
- Hierarchical LOD splats for large scenes
- Memory Reduction techniques
- Repositories:
- Official:
graphdeco‑inria/gaussian‑splatting - Community:
nerfstudio gsplat,WangFeng18,nvpro-samples,Three.js splat demosgithub.com.
- Official:
- Tutorials & Videos:
- LearnOpenCV walkthroughs
- YouTube “Hands-on Course”youtube.com
- SIGGRAPH talk by authors.